Chalk

Wednesday, October 29, 2014

All Fenced In

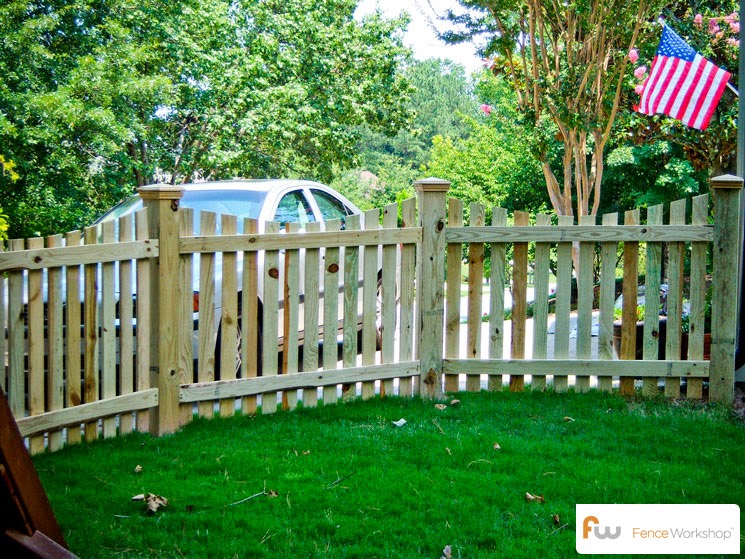
I am thrilled to share our newly fenced in backyard with you! It was a lot of work {really A LOT}, but so worth it!
 
The work crew consisted of...just my wonderful husband.


Fencing in our backyard was just the beginning...we still have big plans for the yard. We will  need to stain the fence, and have plans for lots of landscaping.

Here are photos of some of the new landscaping...


For now we are enjoying the beautiful results and our pooch loves his newfound freedom. 

Thanks so much for stopping by!
  
 
post signature

Monday, August 11, 2014

Just a little hobby...

I've been busy...

This dresser had humble beginnings...She was a little beat up when we found her on craigslist, but I was sure there was potential. I gave her a good cleaning, and a little TLC to the scuffs and scrapes. Then, I painted her with Annie Sloan Chalk Paint in Duck Egg Blue. The paint detail is also ASCP, but in Old White. I kept the original hardware, but painted it with the rest of the dresser. After some light distressing, she had a beautiful new look.


In our new kitchen, we have the perfect place for a little dining table. We didn't need anything large...actually the contrary. I found this beauty on craigslist for a really nice price and I couldn't pass it up. Here are the obligatory before and after photos...

I cleaned and lightly sand the table. The top was finished with General Finishes Gel Stain in Java. The bass and bar stools are painted with Annie Sloan Chalk Paint in French Linen. Now we have a perfect place for "dinner for two" every night. 


post signature

Sunday, July 13, 2014

Our American Dream: Adding the Picket Fence

The American Dream: In modern time, the dream seems to be a perfect spouse, 2.5 children and a house with a white picket fence. I've got #1 in the bag, and #2 is still just a sparkle in our eye...but #3 is the topic of my post today. It's not white, but its going to be the perfect picket fence for our new home.

Our inspiration for the new fence is below...


The fence project started this past week with Casey renting a post-hole auger. Within a day, the holes were all dug.


This week all of the posts went into the ground.


Today, Casey went out and purchased rails and pickets, so I will update you when everything is done and looking beautiful!

post signature

Wednesday, June 11, 2014

How we said goodbye to oak: Gel Stain Tutorial

As I promised when we completed the update of our guest bathroom, today I've finally put together a tutorial for using the gel stain. 

Materials Needed:
1. General Finishes Java Gel Stain (you can buy on Amazon, or find a store near you, here).

 
2. General Finishes Polyacrylic in Satin finish (you can buy on Amazon or find a store near you, here).

 
(3) Painter’s tape


(4) Painter's Pyramids (props your drawers and doors up off of the floor during painting).


(5) Men’s white socks
(6) 100 grit sanding block
(7) Nitrile gloves
(9) Clean Microfiber Cloths

Tutorial:  
Before you begin, tape off your work area with the painters tape, as the gel stain won’t be easily removed if it drips. Then remove all hardware and doors/drawers from the vanity.
The prep work is probably the most important step when you use gel stain. You cannot skimp on the prep or you will not get the results that you’re wanting from the finished product.

Step 1: When refurbishing furniture, vanities or other woodwork in your home, using liquid sandpaper/deglosser or sandpaper helps dull any old paint, gloss or varnish, preps the area for a new coat of paint or varnish and helps bond the new finish to prevent it from chipping off easily. I used a clean microfiber cloth to wipe down the vanity base, drawers and doors with the liquid deglosser. I followed this up with a light sanding using the sanding block, and then again cleaned the dust with a clean, damp cloth.


Step 2: Put on a pair of Nitrile gloves to protect your hands from the stain and then put a men’s sock on your dominant (painting hand). The sock is much easier and faster than using a brush. Apply a light coat of stain. The gel stain has a consistency similar to pudding. For the grooves and crevices I used a small foam brush. The key to gel stain is to apply very light coats. If you glob on a thick coat you will regret it. Wipe the stain on with the grain. Do not wipe it off. Allow the first coat to dry- depending on the humidity where you live the drying process can take anywhere from 1-3 days. You must wait for them to be completely dry before starting the second coat, otherwise you will just wipe the first coat right off and have to start over.
Note: Do not panic after the first coat, when you see how streaky and ugly the stain looks. I promise it will turn out beautifully after a few more coats. Be patient!


Step 3: Repeat the same process for the second and third coat. The instructions suggest that you sand between coats, but when I did this (even with 220 grit and very light pressure) the stain came right off. I suggest that you try to make your coats of stain as clean and smudge-free as possible so that they don’t require any extra sanding between coats.

Step 4: Allow the stain to dry for 24-48 hours. Next, I used General Finishes satin poly/acrylic top coat for the finish. You can apply it with a clean white sock, or with a foam brush as I did.  Make sure that the coats go on nice and thin, with no white bubbles. Any bubbles that are left will not dry clear and you will spend time sanding these away once everything is dry. The final product was even better than I was expecting.
 
 
I think it provided a nice update (and affordable too). After my luck in the bathroom, I used the same procedure for the stairwell banister. 

The result was definitely worth the work.

 
post signature
 

Sunday, June 8, 2014

Weekend Wrap Up: Guest Bathroom Decor

In March, we posted our guest bathroom makeover, here. This past week I decided to give it a little decor love. Alright, no messing around. Here are the "after" photos...
 
 
Rather than a standard towel bar, we opted to use a coat rack that was originally on the garage wall in our new house. After a fresh coat of paint, it was perfect for the job.
 
 
I had some of Casey's photography enlarged and I put them in a couple of frames that were given a fresh coat of paint. The hand-painted tile was purchased in Mexico on our last vacation and now has a perfect home.


These original paintings were purchased on our vacation to Key West with my parents several years ago. They work perfectly with the coastal theme that I was aiming for.
 
 
I hope you like what we've done with this room. Now, we just need guests to use it, hint hint!
 
 
post signature

Friday, May 23, 2014

The Moment We've Waited For: Our Kitchen Makeover

Are you ready for our kitchen update? Well today’s the day! Finally. We have our dreamy new white kitchen and I couldn’t be more ecstatic about it. Fair warning though, this post will be picture heavy but it deserves it. And here it is.
 
Amazing right?!?! I know!! We moved the island slightly, painted the walls in Revere Pewter by Benjamin Moore, added crown molding to the cabinets, shifted the cabinet above the microwave, painted the cabinets, added new hardware to the drawers, and installed a couple of light fixtures.
 
Before we started, I spent a lot of time researching: How do we prep the cabinets for painting? What is the best method to use (spraying, brushing, rolling???) What kind of paint should we use for the best combination of color and durability? I looked at a lot of different kitchen cabinet projects online. I know there are a lot of opinions and methods out there, but after much consternation, we opted to brush the frames and spray the doors. 

So, let's get to the details: First, we purchased the HomeRight Finish Max Fine Finish HVLP Sprayer (link below) . Since the cabinets were covered with peeling, flaking, old gel stain, we started by stripping the old stain. Then, we used mineral spirits to clean off the remaining stain and any residue. After this, we sanded the surface of the cabinets with 120 grit sand paper (with a little help from my new mouse sander, link below)While there are several paint option out there, we went with and oil-based primer and Advance paint in White Dove by Benjamin Moore.  Again, I went on the advice of the experts here.  It was a great decision! I cannot say enough good things about this Advance paint.  Oh. my. goodness.  It has all of the benefits of an oil-based paint, but it is a waterborne alkyd. So, it hardens like an oil, wears like an oil, but cleans up like a latex and it doesn't smell like an oil!  Revolutionary!


This is a "before" photo of the frame that was built behind the cabinet to raise it slightly and bump it out a couple of inches.

 
This photo shows the crown molding after it was installed.


After all of the prep, we needed to remove the cabinet doors and drawers. I highly recommend putting together some sort of numbering system so that you don't lose track of what goes where. While it all seems to make sense when you're planning, trust me that you will be glad you did this. We also taped off the insides of the cabinets, the countertops and floor. Taping off the insides of cabinet frames is harder than it sounds. In our case, the tape refused to stick to the underside of the granite countertops :( We also set up the garage for painting the cabinet doors and drawers.   If you're going to paint both sides of your cabinet doors (like we did), start by painting the back of the cabinet door first.  That way, if you make any mistakes or have problems, you'll learn early and it will be on an inconspicuous part of the cabinet.  Plus, this way the cabinets will end up drying with the outside of the cabinet facing UP, and you don't have to worry about any potential scratches or indentations.  You will have a freshly painted cabinet surface when you rehang your doors.


We followed one coat of primer with 3 coats of paint. The cabinet doors needed at least 24 hours in between each coat of paint. You're talking about at least week of just painting and waiting.  Then you want to let them sit and cure a bit before you rehang them.  In our case, the frames were done a couple of weeks before the drawers and doors, so we had to be extra patient...and it was tough to stay motivated to get the rest done. However, once the doors and drawers were painted and cured enough to reassemble the kitchen, Casey installed new hardware, reinstalled the hinges and rehung the doors and drawers. We selected a brushed nickel cup style pull for the drawers and kept the existing nobs on the cabinets (to save some pennies). 

Now, it is gorgeous and it feels like a brand new kitchen!


post signature
 
Sharing with:
That DIY Showoff
Thrifty Decor Chick (June Link up)
From My Front Porch To Yours
The Girl Creative